Fabrication & Use Guide
The Clench Relief® Pro Rx Mouthpiece is a custom-fit solution designed to protect teeth and restorations from clenching, grinding, and bruxism while providing temporary relief for TMD symptoms. By guiding the lower jaw into an optimal, low-muscle-activity position, it helps decompress the TMJ, reducing tension, popping, and discomfort.
This page provides a step-by-step fabrication video and process, ensuring a precise fit using PVS material that hardens in minutes. You’ll also find best practices for wear, cleaning, storage, and troubleshooting to maximize patient comfort and treatment effectiveness.
Important Notice — Prescription-Only Version
This Fabrication & Use Guide applies only to the Clench Relief® Pro Rx mouthpiece, which is a prescription-only medical device available exclusively through licensed dentists.It does not apply to the consumer version of Clench Relief® sold directly through our website without a prescription.If you are a consumer, please see our How to Use Clench Relief® at Home page for instructions specific to the over-the-counter version.
Watch Dr. David Frey’s six minute instructional video designed specifically for dentists to fabricate the Clench Relief Pro Rx® TMJ Mouthpiece with confidence.
Quick-start Instructions for Providers
PREPARE
1. Have the patient brush their teeth and rinse mouth with water.
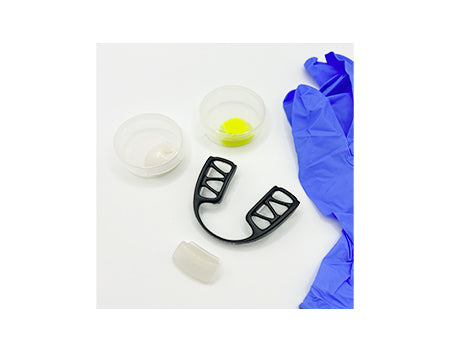
2. Prepare all required items by opening the Clench Relief® Pro Rx Mouthpiece kit and laying out all provided items. The kit contains the following items:
- Two sets of PVS base (3.0 grams) and PVS catalyst (3.0 grams) in containers ( an extra set is provided as a replacement or do over for a second attempt if the first attempt did not set properly).
- Clench Relief® Pro Rx Mouthpiece Frame and Clench Relief® Alignment Guide (CRAG).
- Nitrile gloves.
- Instructions.
3. Before starting, you will need a timer and a sharp blade or scalpel for trimming.
ASSEMBLE
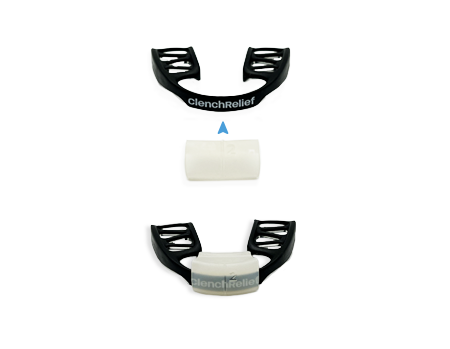
4. Snap the alignment guide into the center of the Clench Relief® Pro Rx Mouthpiece Frame. Use the centerline of the alignment guide for proper center alignment with the Clench Relief® Mouthpiece Frame.
5. Place the assembled frame into the patient's mouth making sure that the alignment guide when attached to the frame and when placed in the patient’s mouth is centered between the two front teeth or in the midline of the patients face and the lower jaw chin.
NOTE: At this point, the prescriber can insert the Clench Relief® Mouthpiece Frame with the attached alignment guide in and out of the patient's mouth to get a sense of how it fits before starting the timed process of mixing, rolling and packing the Clench Relief® Fit Material into the Clench Relief® Mouthpiece Frame.
MIX, ROLL & PACK:
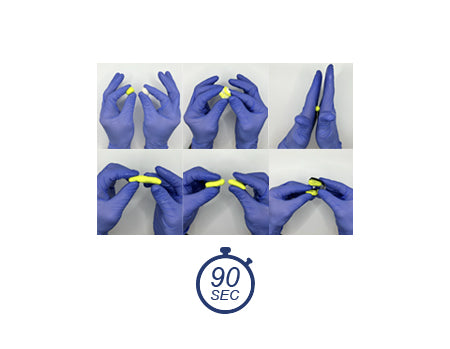
Caution: Next steps are time sensitive. Fit material must be mixed, rolled and packed into the bottoms of the mouthpiece frame and in the patient's mouth in 90 seconds to avoid pre-mature hardening.
6. Wearing the nitrile gloves, start the timer and knead both components of the Clench Relief® Fit Material with fingers and thumbs. Stretch and fold several times, until a uniform color is achieved. This process should take about 30 seconds. Be careful to watch the stopwatch as the Fit Material will begin to harden by 60 seconds. Make sure it is mixed, rolled, packed into the mandibular side of the mouthpiece frame and in the patient's mouth by 90 seconds from the time you start mixing the polyvinyl siloxane to avoid the fit material from setting pre-maturely.
7. Form a uniform tube with the Clench Relief® Fit Material which should be the length of each side of the latticed part of the mouthpiece (approximately 30 mm on each side). Then pinch the middle of the rolled putty to separate into two equal rolls. This process should take ten seconds (total 40-50 seconds from time of beginning to mix fit material).
8. Pack each half of the Clench Relief® Fit Material into the mandibular side (underneath) of both sides of the Mouthpiece Frame
NOTE: The Clench Relief® Fit Material goes into the bottom pockets of the Clench Relief® Mouthpiece Frame.
BORDER, MOLDING & CURING
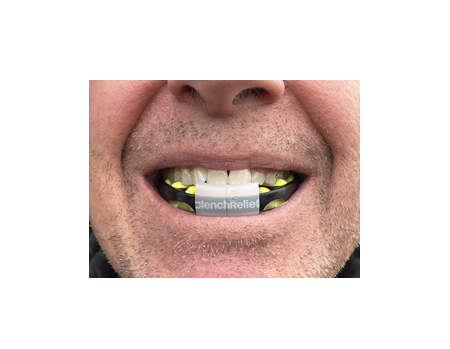
9. Place in patients’ mouth and have the upper and lower central incisors gently grip the CRAG and hold for two minutes while the PVS begins to cure around the posterior teeth: Ensure the center line of the CRAG is in-between the two front teeth and centered with the patients midline of their face and lower chin. Only the two front teeth should be holding the mouthpiece in place on the CRAG, while the recently mixed, soft Clench Relief® Fit Material hardens and sets to conform to the shape of the patient's rear molar teeth.
10. Once removed from the mouth, let the Clench Relief® Fit Material set inside the Clench Relief® Pro Rx Mouthpiece for three minutes and then remove and allow the Polyvinyl Siloxane fully set for 10- 15 minutes before use. Cut away or trim excess after curing with scissors or sharp knife.
11. The patient should have a snug custom-fit over the mandibular teeth. The upper teeth should be indexed into the PVS material.
12. The mouthpiece should be replaced if there is visible damage or if materials should be replaced in order to maintain good oral hygiene.
13. Please have the patient return to inspect the fit and evaluate the integrity of the mouth piece in one week followed by consecutive 3 month examination visits. Any degradation of the polyvinyl siloxane should be replaced and re-set with a new set at this visit.
Recommended Wear Schedule
Unlike traditional nightguards that are only worn during sleep, Clench Relief® is designed for both day and night wear, offering round-the-clock relief from TMJ-related discomfort. Its unique design allows users to wear it discreetly during the day while talking and working, as well as at night for overnight protection.
Recommended Wear Schedule:
- Daytime Use: Wear as needed, especially during high-stress or clenching-prone activities (e.g., working, exercising, driving). The design allows for comfort and function without impeding speech.
- Nighttime Use: Wear nightly to reduce muscle strain, prevent clenching, and promote optimal jaw positioning during sleep.
Cleaning and Storage
- Brush your mouthpiece in cold water with a wet soft toothbrush.
- Allow your Clench Relief® Pro Rx Mouthpiece to air dry.
- Store in the provided case when not in use.
- Avoid hot water or abrasive cleaners.
Warnings
- Clench Relief® Pro Rx Mouthpiece should not be fit on or over loose teeth.
- Clench Relief® Pro Rx Mouthpiece should not be worn if the patient feels more pain.
- Clench Relief® Pro Rx Mouthpiece should not be worn if the patient experiences shortness of breath.
- Clench Relief® Pro Rx Mouthpiece fabrication for patients with fixed bridges with undercuts must be inspected as the polyvinyl siloxane may lock the mouthpiece during fabrication and the risk of the polyvinyl siloxane breakage can cause a choking hazard.
- Clench Relief® Pro Rx Mouthpiece should not be used in patients under the age of 18.
- This is a short-term device to help reduce clenching, grinding, and bruxism and is not intended for long term use unless the Clench Relief® Fit Material is replaced under the supervision of the provider every three months.
Troubleshooting Tips for Fabrication & Proper Use of Clench Relief®
Fabrication Troubleshooting (Custom Fit Process)
Putty Didn’t Set Properly
- Ensure equal mixing of both putty components until color is uniform.
- Work quickly; setting time is approximately 3 minutes.
- If the material is too soft after setting, the mix may have been incomplete—restart with fresh putty.
Mouthpiece Feels Too Loose
- Refabricate the mouthpiece by first gently pulling the existing fit material from the Clench Relief® Mouthpiece Frame. Clean any remnants of PVS from the plastic.
- Mix a second portion of PVS ensuring equal quantities are combined and material is fully mixed.
- Patient should apply firm bite pressure while pressing the material against molars and contours for a snugger fit. There should be no jaw movement during the setting of the material.
- Ensure lips and tongue do not disrupt positioning during setting.
Mouthpiece is Too Tight or Is Uncomfortable
Lightly trim excess material with fine scissors, scalpel or sharp knife.
- Material Overflowing or Uneven Coverage
- Use just enough putty to cover key contact points (molars and bite surface).
- If excess is pressing into soft tissue, remove and reshape before setting.
Proper Use Troubleshooting (Day & Night Wear)
Difficulty Speaking During Day Use
- Wear for short intervals and gradually increase duration to adapt.
- Ensure the fit allows the tongue to rest naturally—remold if needed.
Jaw Discomfort After Wearing
- Mild soreness is normal for the first few uses as muscles adjust.
- If pain persists, check for uneven pressure points and remold for better alignment. Consult Provider if soreness persists.
Mouthpiece Slipping or Not Staying in Place
- Ensure a deep enough imprint of the molars during the fitting process.
- If slipping occurs over time, refabricate.
Excessive Saliva Production
- This is common in the first few days of use. The body adapts over time.
- If excessive, try wearing for shorter periods and gradually extending duration.